
Hostwinds Tutorials
Search results for:
Table of Contents
How to Install Freepbx on a Cloud VPS
Tags: Cloud Servers, VPS
FreePBX is a free, safe, and secure application that manages VOIP (voice over IP) services and acts as a telephone for a server. FreePBX undergoes quality assurance control by Sangoma and offers flexibility and scalability to help meet consumer needs regardless of their needs. Many VOIP services may require license agreements, but FreePBX does not.
Using FreePBX allows for customization via any number of extensions, users, IVRs, and queues that can suit the needs of the tasks at hand. In addition, a robust open-source community provides support in the form of webinars, forums, an entire setup and troubleshooting wiki, and pro-tip videos. Request features and submit bug reports that see immediate results.
FreePBX Requirements
You can install FreePBX on various operating systems. However, the following instructions have \installed on CentOS 8. A VPS or dedicated server with root access and a form of LAMP (Linux, Apache, MongoDB, PHP) installed is required.
FreePBX Preparation
Before installing FreePBX, you will need to first prepare the following on your server by logging into your server via SSH.
Verify that SELinux is disabled
Step 1: use the following command to make sure SELinux is disabled.
sestatus
If selinux is enabled, run the following commands to disable it
sed -i 's/\(^SELINUX=\).*/\SELINUX=disabled/' /etc/sysconfig/selinux
sed -i 's/\(^SELINUX=\).*/\SELINUX=disabled/' /etc/selinux/config
Then reboot, and verify the SELinux status by running 'sestatus.' It should say:
SELinux status: disabled
Step 2: Before beginning further installation, ensure your OS is up-to-date by running the following command
sudo dnf -y update
Install Dependencies
Step 1: Install Development tools.
dnf -y group install "Development Tools."
Step 2: Create a new user named "asterisk"
adduser asterisk -m -c "Asterisk User"
Step 3: Install Additional Required Dependencies
Enable powertools
dnf config-manager --set-enabled powertools
Install dependencies
dnf -y install lynx tftp-server unixODBC mariadb-server mariadb httpd ncurses-devel sendmail sendmail-cf newt-devel libxml2-devel libtiff-devel gtk2-devel subversion git wget vim uuid-devel sqlite-devel net-tools gnutls-devel texinfo libuuid-devel libedit-devel
Disable powertools
dnf config-manager --set-disabled powertools
Step 4: Install mysql odbc connector 8.0.2
dnf install -y https://downloads.mysql.com/archives/get/p/10/file/mysql-connector-odbc-8.0.21-1.el8.x86_64.rpm

dnf install -y epel-release

dnf install -y libid3tag

dnf install -y https://forensics.cert.org/cert-forensics-tools-release-el8.rpm

dnf --enablerepo=forensics install -y sox

dnf install -y audiofile-devel

dnf install -y python3-devel
Step 5: Install php7.2
dnf remove php*
dnf install -y php php-pdo php-mysqlnd php-mbstring php-pear php-process php-xml php-opcache php-ldap php-intl php-soap php-json
Step 6: Install Nodejs version 12
dnf module enable nodejs:12 -y
dnf install -y nodejs
Install and configure MariaDB
Step 1: Enable and start mariadb
systemctl enable mariadb.service
systemctl start mariadb
Step 2: Secure the mariaDB installation.
The prompt will ask you for your current root password. Since you just installed MySQL, you won't have one set up, so leave it blank by pressing enter. Then the prompt will ask you if you want to set a root password. Do not set a root password. We secure the database automatically as part of the install script. You can choose yes for the rest to remove some sample users and databases, disable remote root logins, and load these new rules.
mysql_secure_installation
Enable and start Apache Web Server
Step 1: Run the following commands to enable and start the Apache webserver
systemctl enable httpd.service
systemctl start httpd.service
Step 2: Verify Apache service status
systemctl status httpd.service
Install Legacy Pear requirements
Run the following command to install legacy pear
pear install Console_Getopt
Download and install Asterisk
Step 1: Download Asterisk source files
cd /usr/src
wget http://downloads.asterisk.org/pub/telephony/asterisk/asterisk-16-current.tar.gz
Step 2: Extract your drupal download.
tar xvfz asterisk-16-current.tar.gz
Step 3: Remove the tar file
rm -f asterisk-*-current.tar.gz
Compile and install Asterisk
Step 1: Go to
cd asterisk-*
contrib/scripts/install_prereq install
./configure --libdir=/usr/lib64 --with-jansson-bundled
contrib/scripts/get_mp3_source.sh
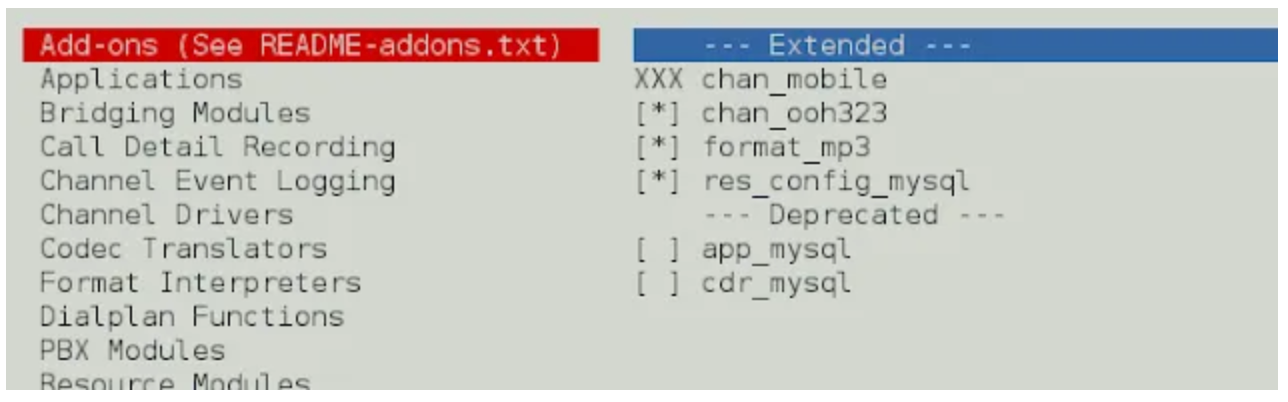
make menuselect
Step 2: You will be prompted at the point to pick which modules to build. You will already enable most of them, but if you want MP3 support (e.g., for Music on Hold), you need to manually turn on 'format_mp3' on the first page. Select "Save & Exit".
Step 3: Make the Asterisk package
make
make install
make config
make samples
ldconfig
chkconfig asterisk off
Step 4: Set Asterisk ownership permissions
chown asterisk. /var/run/asterisk
chown -R asterisk. /etc/asterisk
chown -R asterisk. /var/{lib,log,spool}/asterisk
chown -R asterisk. /usr/lib64/asterisk
chown -R asterisk. /var/www
Update Apache settings
Step 1: update the following parameters.
sed -i 's/\(^upload_max_filesize = \).*/\120M/' /etc/php.ini
sed -i 's/\(^memory_limit = \).*/\1256M/' /etc/php.ini
sed -i 's/^\(User\|Group\).*/\1 asterisk/' /etc/httpd/conf/httpd.conf
sed -i 's/AllowOverride None/AllowOverride All/' /etc/httpd/conf/httpd.conf
sed -i 's/\(^user = \).*/\1asterisk/' /etc/php-fpm.d/www.conf
sed -i 's/\(^group = \).*/\1asterisk/' /etc/php-fpm.d/www.conf
sed -i 's/\(^listen.acl_users = apache,nginx\).*/\1,asterisk/' /etc/php-fpm.d/www.conf
Step 2: Restart apache and PHP-fpm
systemctl restart httpd.service
systemctl restart php-fpm
Download and install FreePBX.
Step 1: Download and install the FreePBX source files.
cd /usr/src
wget http://mirror.freepbx.org/modules/packages/freepbx/freepbx-15.0-latest.tgz
tar xfz freepbx-15.0-latest.tgz
rm -f freepbx-15.0-latest.tgz
cd freepbx
./start_asterisk start
./install -n
Step 2: Create a FreePBX Boot Script
vi /etc/systemd/system/freepbx.service
Add the following to the file.
[Unit]
Description=FreePBX VoIP Server
After=mariadb.service

[Service]
Type=oneshot
RemainAfterExit=yes
ExecStart=/usr/sbin/fwconsole start -q
ExecStop=/usr/sbin/fwconsole stop -q

[Install]
WantedBy=multi-user.target
Step 3: Run the script
systemctl enable freepbx.service
Step 4: Start the PBX Service
systemctl start freepbx
Step 5: Check the status of the PBX Service
systemctl status -l freepbx.service
Complete Setup Using FreePBX GUI (Graphical User Interface)
Step 1: In your browser, go to your servers IP address (http:\\192.x.x.1)
Step 2: Create an admin username and password.
Step 3: Enter an email address that you would like to send your notifications.
Step 4: Name your FreePBX Server.
Step 5: Make sure you leave Module updates, security updates, and security emails enabled and click setup system.
Written by Hostwinds Team / July 31, 2021