
Hostwinds Tutorials
Search results for:
Table of Contents
How to Install OpenVPN on a Cloud VPS
Tags: Cloud Servers, VPS
OpenVPN is a Virtual Private Network (VPN) software installed on a Virtual Private Server (VPS). VPNs take advantage of the network provided by the VPS without needing to connect through an SSH or RDP session. You can connect devices to the VPN server and use that network to mask your local area network.
OpenVPN Requirements
You will need root or administrator access to a server. You can install OpenVPN on either a Linux, Windows VPS, or Dedicated Server. Below are the steps to install OpenVPN. Note that you will need to use a command-line interface to do so.
OpenVPN Preparation
Step 1: Update your system.
Sudo yum update
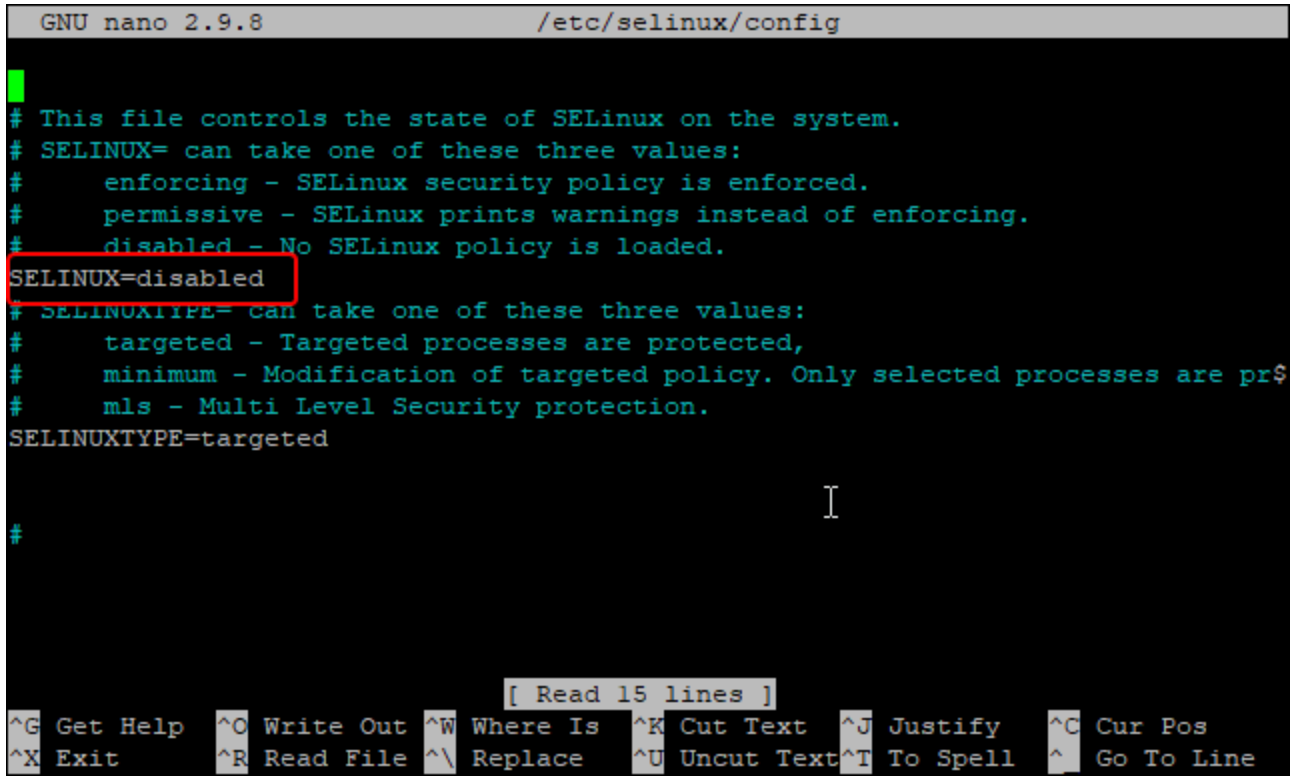
Step 2: Edit the SELinux config file
nano /etc/selinux/config
Step 3: Set SELinux to Disabled
SELINUX=disabled- CTRL + X
- Press the Y key
- Press the Enter key
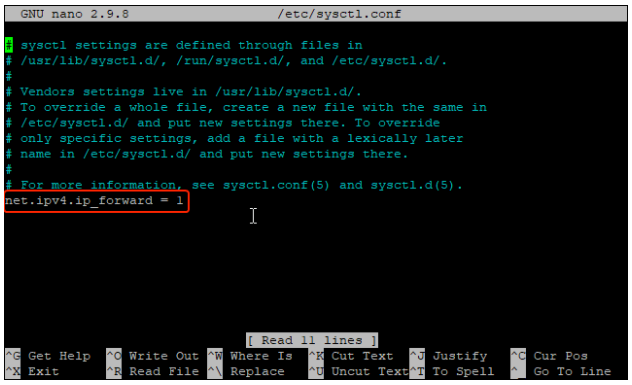
Step 4: Edit the sysctl.conf file
nano /etc/sysctl.conf
Step 5: Add the following line to the sysctl.conf file to enable IP Forwarding
net.ipv4.ip\_forward = 1CTRL + X
Press the Y key
Press the Enter key
Step 6: Apply the changes
sysctl -p
Installing OpenVPN
**Step 1: ** Install the OpenVPN Server
dnf install epel-release -y
dnf install openvpn -y
Setting up the Certificate Authority
Step 1: Download easy-rsa for managing SSL Certificates
cd /etc/openvpn
wget https://github.com/OpenVPN/easy-rsa/releases/download/v3.0.6/EasyRSA-unix-v3.0.6.tgz
tar -xvzf EasyRSA-unix-v3.0.6.tgz
mv EasyRSA-v3.0.6 easy-rsa
Step 2: Setup Certificate Authority
cd /etc/openvpn/easy-rsa
nano vars
Step 3: Add the following and replace anything with \ with your VPS hostname (it looks something like hwsrv-\. Additionally, replace the "set_var EASYRSA_REQ_EMAIL" line with your email:
set_var EASYRSA                 "$PWD"
set_var EASYRSA_PKI             "$EASYRSA/pki"
set_var EASYRSA_DN              "cn_only"
set_var EASYRSA_REQ_COUNTRY     "USA"
set_var EASYRSA_REQ_PROVINCE    "Seatle"
set_var EASYRSA_REQ_CITY        "Seatle"
set_var EASYRSA_REQ_ORG         "<HOSTNAME> CERTIFICATE AUTHORITY"
set_var EASYRSA_REQ_EMAIL       "<yourEmail@hostwinds.com>"
set_var EASYRSA_REQ_OU          "<HOSTNAME> EASY CA"
set_var EASYRSA_KEY_SIZE        2048
set_var EASYRSA_ALGO            rsa
set_var EASYRSA_CA_EXPIRE       7500
set_var EASYRSA_CERT_EXPIRE     365
set_var EASYRSA_NS_SUPPORT      "no"
set_var EASYRSA_NS_COMMENT      "<HOSTNAME> CERTIFICATE AUTHORITY"
set_var EASYRSA_EXT_DIR         "$EASYRSA/x509-types"
set_var EASYRSA_SSL_CONF        "$EASYRSA/openssl-easyrsa.cnf"
set_var EASYRSA_DIGEST          "sha256"
Step 4: Initiate the PKI Directory
./easyrsa init-pki
Step 5: Build the CA Certificate
./easyrsa build-caIt will ask you to provide a password. Note the password externally and input it into the prompt. This passphrase will be required in future steps.
You will also be asked to input a Common Name. You can press enter to use the default or input a custom common name of your choice.
The command will then generate two files named ca.key and ca.crt. These certificates will be used to sign the server and the clients' certificates.
Step 6: Generate the Server Certificate Files. Replace the \ with the server hostname. Looks like "hwsrv-\"
./easyrsa gen-req <HOSTNAME> nopassThis will also ask for a common name. You can input whatever you wish. Some names you could use would be your user, host, or server name. Alternatively, you can just press "Enter" to use the default.
Step 7: Sign the server key using the CA. Replace the \ with the server hostname. It looks like "hwsrv-\"
./easyrsa sign-req server <HOSTNAME>Type "yes" then press Enter
Additionally, you'll need to provide a passphrase. Use the passphrase you created in Step 5
Step 8: Verify the generated certificate file with the following command. Replace the \ with the server hostname. It looks like "hwsrv-\":
openssl verify -CAfile pki/ca.crt pki/issued/<HOSTNAME>.crtIt should look something like this:
pki/issued/<HOSTNAME>.crt: OK
Step 9: Generate a strong Diffie-Hellman key to use for the key exchange:
./easyrsa gen-dh
Step 10: ** Copy the certificate files to /etc/openvpn/server/ and **replace the \ with the server hostname. It looks like "hwsrv-\"
cp pki/ca.crt /etc/openvpn/server/
cp pki/dh.pem /etc/openvpn/server/
cp pki/private/<HOSTNAME>.key /etc/openvpn/server/
cp pki/issued/<HOSTNAME>.crt /etc/openvpn/server/
Step 11: Build the client key file:
./easyrsa gen-req client nopassPress enter or input a common name of your choice.
Step 12: Sign the Client Key using the CA Certificate:
./easyrsa sign-req client clientType the word, 'yes' then press enter to confirm
Enter the passphrase you noted down in Step 5
Step 13: Copy all of the Client Certificate and Key Files to the /etc/openvpn/client/ directory
cp pki/ca.crt /etc/openvpn/client/
cp pki/issued/client.crt /etc/openvpn/client/
cp pki/private/client.key /etc/openvpn/client/
Configuring the OpenVPN Server
Step 1: Create a new OpenVPN Configuration file inside the /etc/openvpn/client/directory/ file path
nano /etc/openvpn/server/server.confAdd the following in the text editor and replace anything labeled \ with your server hostname. It looks like "hwsrv-\
port 1194
proto udp
dev tun
ca /etc/openvpn/server/ca.crt
cert /etc/openvpn/server/<HOSTNAME>.crt
key /etc/openvpn/server/<HOSTNAME>.key
dh /etc/openvpn/server/dh.pem
server 10.8.0.0 255.255.255.0
push "redirect-gateway def1"

push "dhcp-option DNS 208.67.222.222"
push "dhcp-option DNS 208.67.220.220"
duplicate-cn
cipher AES-256-CBC
tls-version-min 1.2
tls-cipher TLS-DHE-RSA-WITH-AES-256-GCM-SHA384:TLS-DHE-RSA-WITH-AES-256-CBC-SHA256:TLS-DHE-RSA-WITH-AES-128-GCM-SHA256:TLS-DHE-RSA-WITH-AES-128-CBC-SHA256
auth SHA512
auth-nocache
keepalive 20 60
persist-key
persist-tun
compress lz4
daemon
user nobody
group nobody
log-append /var/log/openvpn.log
verb 3
Now do the following to save your file:
- CTRL + X
- Press the Y key
- Press the Enter key
Step 2: Start the OpenVPN Server
systemctl start openvpn-server@server
systemctl enable openvpn-server@server
systemctl status openvpn-server@server
Step 3: Generate the Client Configuration File. This is needed to connect to the OpenVPN server from the client system.
nano /etc/openvpn/client/client.ovpnInsert the following and replace \ with your servers Dedicated Main IPv4 Address
client
dev tun
proto udp
remote <Server IP> 1194
ca ca.crt
cert client.crt
key client.key
cipher AES-256-CBC
auth SHA512
auth-nocache
tls-version-min 1.2
tls-cipher TLS-DHE-RSA-WITH-AES-256-GCM-SHA384:TLS-DHE-RSA-WITH-AES-256-CBC-SHA256:TLS-DHE-RSA-WITH-AES-128-GCM-SHA256:TLS-DHE-RSA-WITH-AES-128-CBC-SHA256
resolv-retry infinite
compress lz4
nobind
persist-key
persist-tun
mute-replay-warnings
verb 3
Now do the following to save your file:
- CTRL + X
- Press the Y key
- Press the Enter key
Configure OpenVPN routing using Firewall
Step 1: Add the OpenVPN service and tun0 interface to the trusted firewall zone:
firewall-cmd --permanent --add-service=openvpn
firewall-cmd --permanent --zone=trusted --add-service=openvpn
firewall-cmd --permanent --zone=trusted --add-interface=tun0
Step 2: Add the MASQUERADE on the default zone:
firewall-cmd --add-masquerade
firewall-cmd --permanent --add-masquerade
Step 3: Run the following command to masquerade the internet traffic coming from the VPN. Replace \ with your server hostname. It will looks like, "hwsrv\. In this case, you would not need the dash in between the "hwsrv" and the "\"
<HOSTNAME>ovpn=$(ip route get 8.8.8.8 | awk 'NR==1 {print $(NF-2)}')
firewall-cmd --permanent --direct --passthrough ipv4 -t nat -A POSTROUTING -s 10.8.0.0/24 -o $hwsrv702659ovpn -j MASQUERADE
Step 4: Implement the changes:
firewall-cmd --reload
Downloading the OVPN File
Step 1: You will need to download the OVPN directory to your local machine. You can do this in several different ways. The file path you need to download is the /etc/openvpn/client directory.
Open your Local Computer's terminal and type the following. Ensure you replace \ with your server's dedicated IPv4:
scp -r root@**\<SERVER IP>**:/etc/openvpn/client .Alternatively, you can follow this guide on how to connect to your server through SFTP using FileZilla: https://www.hostwinds.com/tutorials/installing-and-connecting-to-filezilla-server-for-windows-server
Setting Up Your Local OpenVPN Client
Step 1: Install the OpenVPN Client. If you have a Windows Machine, you can install it here: https://openvpn.net/client-connect-vpn-for-windows/
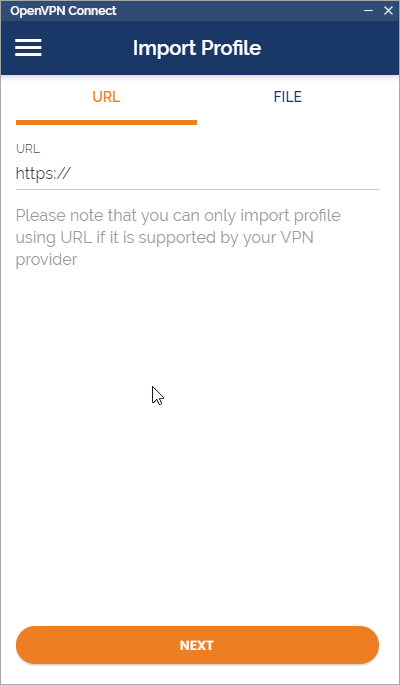
Step 2: Import the OpenVPN profile using the downloaded file, "client.ovpn"
Step 3: Give your profile a name or leave it as the default. Click "Add" after importing the OVPN file.

Step 4: Connect to your VPN to start using the network!
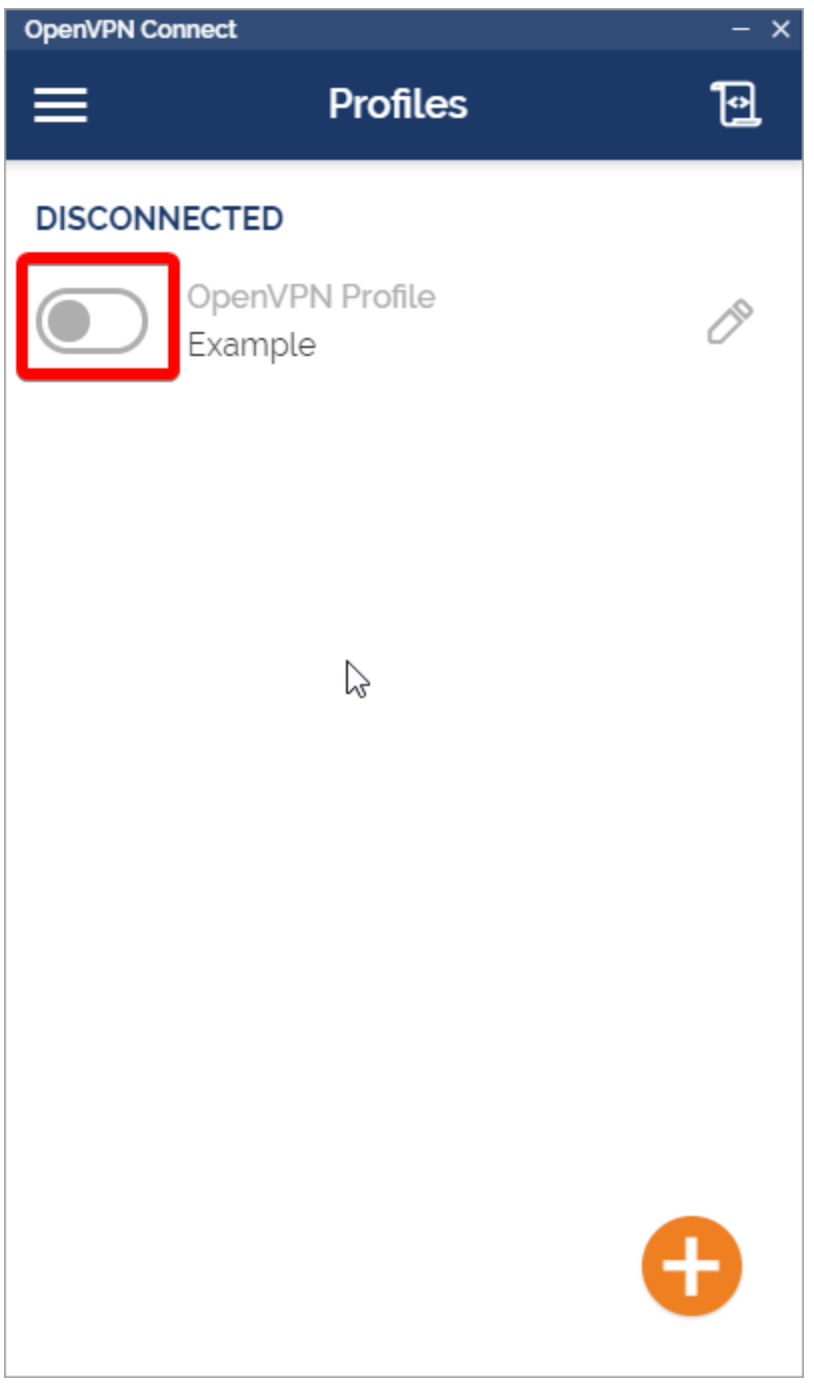
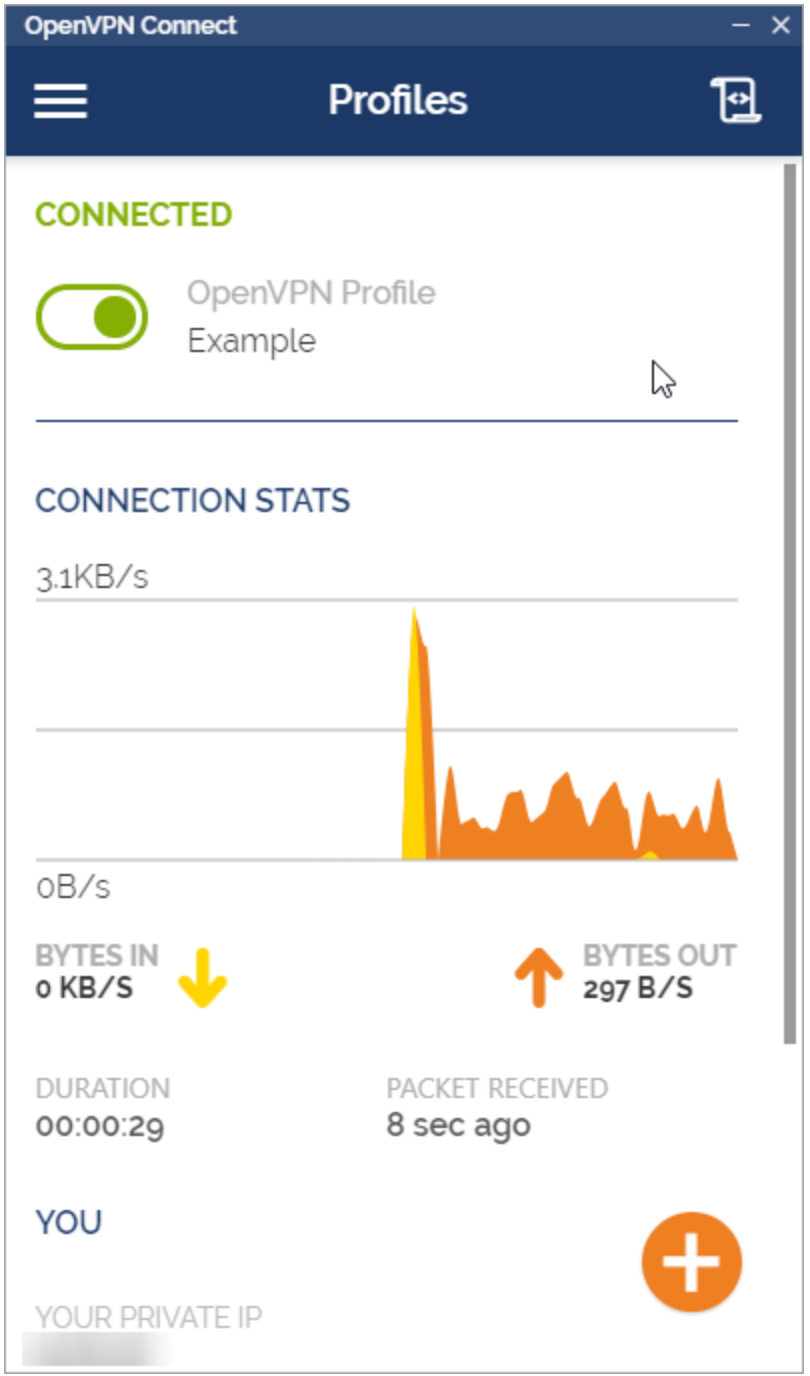
Step 5: You should be connected to your VPN. Your interface should look like this:
Step 6: Congratulations! You're all done! You can verify your Public IP address from https://whatismyipaddress.com/ to make sure you are using your VPS network.
Written by Hostwinds Team / July 31, 2021